 1-866-739-2568


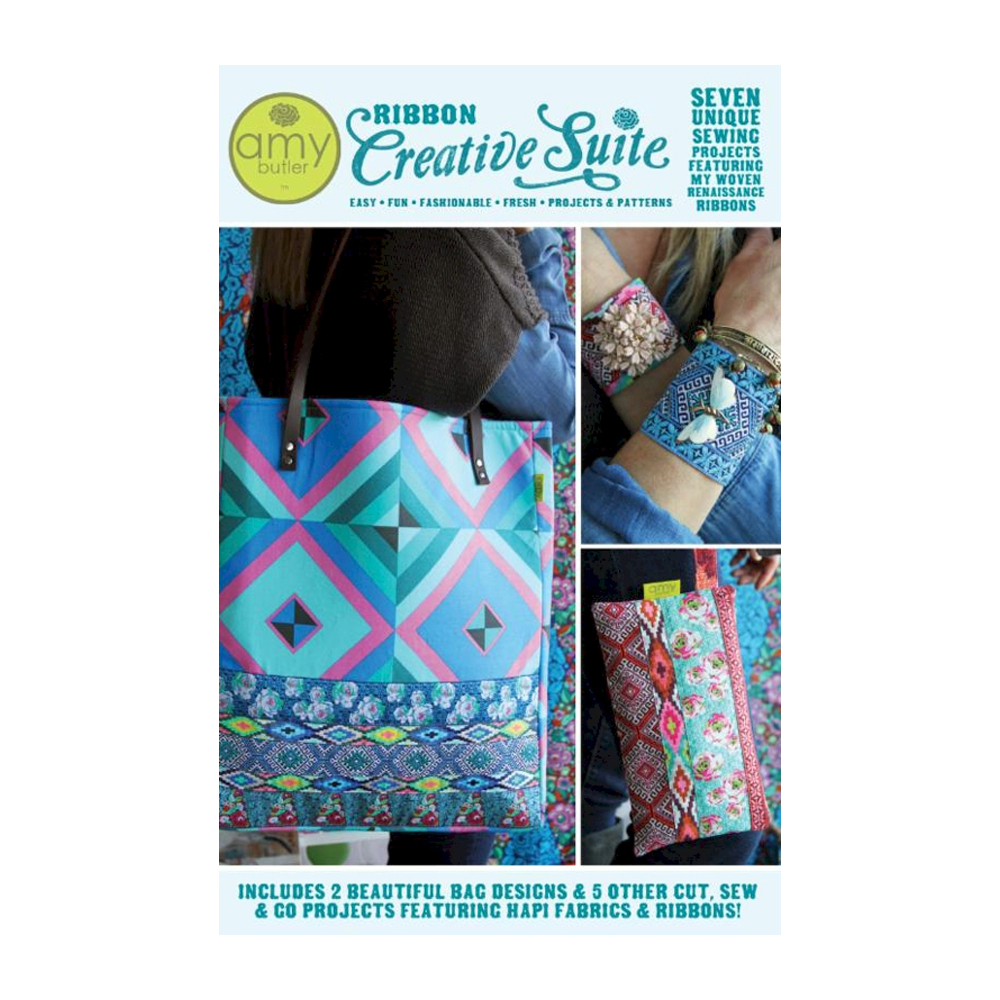
Ribbon Creative Suite Sewing Pattern by Amy Butler - CLOSEOUT
This collection of 7 fabulously easy and gift-able ribbon projects will inspire and satisfy your next crafting adventure! I designed each project with ease in mind and small yardage amounts so you can have the freedom to play with several of my designs and create one of a kind unique treasures for your loved ones and yourself! These projects feature my Hapi fabrics and ribbons from renaissanceribbons.com Enjoy and Happy, Happy Sewing! - Love, Amy
Materials List
Allow extra yardage for matching or centering a design on your fabric
PROJECT ONE: HEAVENLY HEADBAND
Finished size: 20-21" circumference with elastic; Ribbon Band: 16" length x width of ribbon(s)
Note: The Headband can be made using 1 wide ribbon OR 2 narrow ribbons that are sewn side-by-side. Ribbon and interfacing yardage is for one Headband. You can get 3 Headbands from the Backing fabric yardage.
Ribbon Yardage Needed:
- For a 1 Ribbon Headband - 1/2 yard length of 1 ½” wide ribbon
OR
- For a 2 Ribbon Headband - 2 – 1/2 yard lengths of 5/8” wide ribbon
- 1/8 yard of voile fabric (or other light weight fabric) for Backing
- 1/8 yard of lightweight fusible knit interfacing - (I use EK130 Easy Knit from Pellon®)
- 5” length of 1/4” – 1/2” wide braided elastic or 5/8” wide fold-over elastic
- 1 spool of transparent thread
- 1 spool of coordinating all-purpose thread
PROJECT TWO: MEMOIRE TOTE WITH LEATHER STRAPS
Finished size: 14 3/4" wide x 2" deep x 19" high (excluding straps)
- 5/8 yard 56” wide linen/cotton home decor fabric for the Exterior
- 1 ¼ yard 44” wide quilting cotton fabric for the Lining
- 1/2 yard each of 7 coordinating ribbons
- 1 package of 18” x 58” Soft and Stable® http://www.byannie.com/
- 1 ¼ yard 20” wide fusible woven interfacing - (I use Shape Flex® SF 101 from Pellon®)
- 2 leather belt straps – 3/4” wide x 32” long x 1/8” thick or one 1 ½” wide x 32” x 1/8” thick leather belt, split lengthwise using a Strap Cutter.
- 8 – 7mm Double Cap Rivets 3/8” thick and Rivet Setting Tool
- Craftool Drive Punch 1/8”
- Rubber mallet (found in most hardware stores)
- 1 spool transparent thread
- 1 spool of coordinating all-purpose thread
- Chalk pencil
- Turning tool (such as a closed pair of scissors)
Note: You can find the Strap Cutter, Rivets, Drive Punch and Setting Tool on this website: (http://www.tandyleatherfactory.com)
PROJECT THREE: TREASURE WRISTLET
Finished size: 9" wide x height of the ribbon widths (excluding strap); strap length 5 1/2"
- 1/4 yard 44” wide quilting cotton for the Exterior
- 1/4 yard 44” wide quilting cotton for the Lining
- 1/8 yard 44” wide quilting cotton for the Strap
- 1/3 yard each of 4 coordinating ribbons
Note: The combined widths of the ribbons will determine the Wristlet Height. See instructions for measuring details.
- 1/3 yard 20” wide fusible woven interfacing - (I use Shape Flex® SF 101 from Pellon®)
- 1 coordinating 12” invisible zipper
- 1 spool transparent thread
- 1 spool of coordinating all-purpose thread
- Turning tool (such as a closed pair of scissors)
- Regular Zipper Foot (for your sewing machine)
- Invisible Zipper Foot (for your sewing machine)
PROJECT FOUR: BROCADE CUFF
Finished size: Wrist circumference + 2 1/2" x width of your 2 ribbons
Note: Ribbon yardage listed is for 1 ribbon cuff; there is enough canvas and backing fabric for 4 additional cuffs, and interfacing for 2 additional cuffs.
- Ribbon Yardage Needed:
- 1st ribbon – 3/8 yard
- 2nd ribbon – 3/8 yard
- 1/8 yard 45” wide quilting cotton or Voile for Backing
- 1/8 yard 60" wide Cotton Canvas (www.jamesthompson.com)
- 1 spool transparent thread
- 1 spool of coordinating all-purpose thread
- Turning tool (such as a closed pair of scissors)
- 1 pkg of 4 Pearl Snap Fasteners (I used Prym-Dritz® - each cuff will take 1-2 snaps each depending on your cuff width.)
- 1 vintage broach (optional)
- Hammer and empty spool of thread for attaching the snaps - or use a Snap Fastener such as Dritz® "Easy Attacher®" Kit
PROJECT FIVE: IMPERIAL BOOKMARKS
Finished size: 9" long (excluding bead fob) x width of ribbon(s)
Note: Ribbon yardage listed is for 1 bookmark.
Ribbon Bookmark
- Ribbon Yardage Needed:
- For a 1 Ribbon Bookmark- 5/8 yard of 2” wide ribbon OR
- For a 2 Ribbon Bookmark – 5/8 yard of both 1 ½” wide main ribbon and 5/8” wide coordinating ribbon
- 1/8 yard Peltex®
- 1 spool of transparent thread
- Bead Fob (optional)
- 1 ½ yards Cotton Braiding Cord 1mm (I used Natural Cotton Braiding Cord by Clubhouse Crafts™ )
- 1 Main Bead (5/8”-3/4” in diameter) Note: make sure the center hole is large enough for 4 strands of the cotton braiding cord to pass through.
- 30-32 Assorted Beads (1/4”-1/2” in diameter) used for Bead Fob Fringe. Note: make sure the center holes of the beads are large enough for one strand of cotton braiding cord to pass through.
(Great sources for beads are www.beadsbysandy.com, www.chevronbeads.com/catalog.html, www.fusionbeads.com and www.beadparadise.com )
PROJECT SIX: PYRAMID PILLOW
Finished size: 20" square
Note: Ribbon yardage listed is for 1 pillow. The pillow can be made using 44" wide quilting fabric OR 54" wide mid-weight Home Decor Fabric.
- Ribbon Yardage Needed:
- For Center Ribbon - 5/8 yard of 2” wide ribbon AND
- For the Side Ribbons - 1 1/4 yards of 5/8” wide coordinating ribbon
- 3/4 yard Main Print for Pillow Front
- 1 1/4 yards Coordinating Print for Pillow Back and Piping
- 2 1/2 yards of (size 6/32”) cotton cording
- 20” Pillow Form - I use Soft Touch® pillow forms from Fairfield®
- 1 spool of coordinating all-purpose thread
- 1 spool of transparent thread
- Turning tool (such as a closed pair of scissors)
- Zipper Foot (or Pearl/Piping Foot - for your sewing machine)
PROJECT SEVEN: DREAM BIG MEMO BOARD
Finished size: 16" wide x 23" high x 1/2" thick
Note: The Inspiration Board can be made in different sizes. Purchase enough fabric to cover the front of your piece of foam board with a 2" overhang on all 4 sides.
- 3/4 yard 56” wide mid-weight home decor fabric
- 3/4 yard each of 3 different ribbon widths
- 3/4 yard cotton muslin
- 20”x 30” piece of foam board (1/2” thick)
- 24" ruler or metal ruler
- Craft utility knife
- Hot glue gun and glue sticks
- Newspapers for easy clean up
- Picture hanger (optional)
TOOLS NEEDED (for all 7 projects):
Scissors, Fabric marking pen/pencil, Straight pins, Fabric spray adhesive (I use - Sulky® KK2000™), Iron, Ironing Board, Press cloth, Ruler, Rotary cutter & mat, Seam ripper


